搜索到
36
篇与
的结果
-
![极创屋点餐小程序]() 极创屋点餐小程序 多门店点餐小程序,正版商用,完美运营无BUG,持续更新功能购买即送一年免费更新全开源,无需授权,自用无限制,可二开,禁止倒卖,发现后将终止更新。演示小程序扫码:或微信搜索:云龙让茶 体验H5版:https://drink.icufree.com/h5账号:13672654416密码:123456后台:https://drink.icufree.com/admins.php账号:admin密码:123456更多详细信息可联系客服客服QQ:965842886技术栈:前端:Uniapp + uview后端:Thinkphp + mysql5.7+支持打包:小程序、H5、APP产品特色多门店支持,使用连锁店模式如喜茶、霸王茶姬、麦当劳、瑞幸等子门店功能,精细化控制门店权限精准数据统计,门店、商品统计图表、销量金额、支付方式一目了然0成本运营,搭建好后只需一台平板甚至手机即可在线接单极低资源占用,实测最低只需2核4G即可支持每日数千单工作台模式,自带Websocket实时通知,免除轮询性能烦扰积分商城,实物/虚拟全部支持,余额/积分我全都要多年打磨,实测支持千万级数据,持续性能优化用户签到、套餐、小料、消息订阅、IP归属地、图片压缩、数据验证、语音通知等海量功能可自行体验
极创屋点餐小程序 多门店点餐小程序,正版商用,完美运营无BUG,持续更新功能购买即送一年免费更新全开源,无需授权,自用无限制,可二开,禁止倒卖,发现后将终止更新。演示小程序扫码:或微信搜索:云龙让茶 体验H5版:https://drink.icufree.com/h5账号:13672654416密码:123456后台:https://drink.icufree.com/admins.php账号:admin密码:123456更多详细信息可联系客服客服QQ:965842886技术栈:前端:Uniapp + uview后端:Thinkphp + mysql5.7+支持打包:小程序、H5、APP产品特色多门店支持,使用连锁店模式如喜茶、霸王茶姬、麦当劳、瑞幸等子门店功能,精细化控制门店权限精准数据统计,门店、商品统计图表、销量金额、支付方式一目了然0成本运营,搭建好后只需一台平板甚至手机即可在线接单极低资源占用,实测最低只需2核4G即可支持每日数千单工作台模式,自带Websocket实时通知,免除轮询性能烦扰积分商城,实物/虚拟全部支持,余额/积分我全都要多年打磨,实测支持千万级数据,持续性能优化用户签到、套餐、小料、消息订阅、IP归属地、图片压缩、数据验证、语音通知等海量功能可自行体验 -
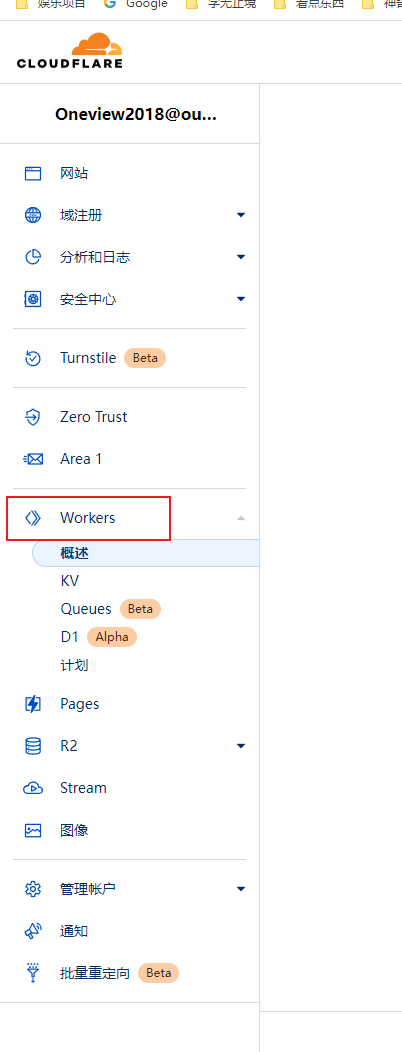
![使用CloudFlare制作镜像加速站如Github]() 使用CloudFlare制作镜像加速站如Github 这里以Github举例登录Cloudflare点击左侧的Workers,创建一个服务,选择默认的Http处理程序即可点击快速编辑,复制代码保存到左侧编辑框,然后点保存并部署// 要代理的网站,这里用github举例 const upstream = 'raw.githubusercontent.com' // 要代理的网站移动版,可以和上面网站一样 const upstream_mobile = 'raw.githubusercontent.com' // 访问区域黑名单(按需设置). const blocked_region = [] // IP地址黑名单(按需设置). const blocked_ip_address = ['0.0.0.0', '127.0.0.1'] // 路径替换. const replace_dict = { '$upstream': '$custom_domain', '//archiveofourown.org': '' } addEventListener('fetch', event => { event.respondWith(fetchAndApply(event.request)); }) async function fetchAndApply(request) { const ip_address = request.headers.get('cf-connecting-ip'); const user_agent = request.headers.get('user-agent'); let response = null; let url = new URL(request.url); let url_host = url.host; if (url.protocol == 'http:') { url.protocol = 'https:' response = Response.redirect(url.href); return response; } if (await device_status(user_agent)) { var upstream_domain = upstream; } else { var upstream_domain = upstream_mobile; } url.host = upstream_domain; if(blocked_ip_address.includes(ip_address)){ response = new Response('Access denied: Your IP address is blocked by WorkersProxy.', { status: 403 }); } else{ let method = request.method; let request_headers = request.headers; let new_request_headers = new Headers(request_headers); new_request_headers.set('Host', upstream_domain); new_request_headers.set('Referer', url.href); let original_response = await fetch(url.href, { method: method, headers: new_request_headers }) let original_response_clone = original_response.clone(); let original_text = null; let response_headers = original_response.headers; let new_response_headers = new Headers(response_headers); let status = original_response.status; new_response_headers.set('cache-control' ,'public, max-age=14400') new_response_headers.set('access-control-allow-origin', '*'); new_response_headers.set('access-control-allow-credentials', true); new_response_headers.delete('content-security-policy'); new_response_headers.delete('content-security-policy-report-only'); new_response_headers.delete('clear-site-data'); const content_type = new_response_headers.get('content-type'); if (content_type.includes('text/html') && content_type.includes('UTF-8')) { original_text = await replace_response_text(original_response_clone, upstream_domain, url_host); } else { original_text = original_response_clone.body } response = new Response(original_text, { status, headers: new_response_headers }) } return response; } async function replace_response_text(response, upstream_domain, host_name) { let text = await response.text() var i, j; for (i in replace_dict) { j = replace_dict[i] if (i == '$upstream') { i = upstream_domain } else if (i == '$custom_domain') { i = host_name } if (j == '$upstream') { j = upstream_domain } else if (j == '$custom_domain') { j = host_name } let re = new RegExp(i, 'g') text = text.replace(re, j); } return text; } async function device_status (user_agent_info) { var agents = ["Android", "iPhone", "SymbianOS", "Windows Phone", "iPad", "iPod"]; var flag = true; for (var v = 0; v < agents.length; v++) { if (user_agent_info.indexOf(agents[v]) > 0) { flag = false; break; } } return flag; }然后打开链接就可以代理访问了如果需要自定义域名,直接把域名的CNAME解析到你得链接就可以。或者点击触发器,添加自定义域就可以
使用CloudFlare制作镜像加速站如Github 这里以Github举例登录Cloudflare点击左侧的Workers,创建一个服务,选择默认的Http处理程序即可点击快速编辑,复制代码保存到左侧编辑框,然后点保存并部署// 要代理的网站,这里用github举例 const upstream = 'raw.githubusercontent.com' // 要代理的网站移动版,可以和上面网站一样 const upstream_mobile = 'raw.githubusercontent.com' // 访问区域黑名单(按需设置). const blocked_region = [] // IP地址黑名单(按需设置). const blocked_ip_address = ['0.0.0.0', '127.0.0.1'] // 路径替换. const replace_dict = { '$upstream': '$custom_domain', '//archiveofourown.org': '' } addEventListener('fetch', event => { event.respondWith(fetchAndApply(event.request)); }) async function fetchAndApply(request) { const ip_address = request.headers.get('cf-connecting-ip'); const user_agent = request.headers.get('user-agent'); let response = null; let url = new URL(request.url); let url_host = url.host; if (url.protocol == 'http:') { url.protocol = 'https:' response = Response.redirect(url.href); return response; } if (await device_status(user_agent)) { var upstream_domain = upstream; } else { var upstream_domain = upstream_mobile; } url.host = upstream_domain; if(blocked_ip_address.includes(ip_address)){ response = new Response('Access denied: Your IP address is blocked by WorkersProxy.', { status: 403 }); } else{ let method = request.method; let request_headers = request.headers; let new_request_headers = new Headers(request_headers); new_request_headers.set('Host', upstream_domain); new_request_headers.set('Referer', url.href); let original_response = await fetch(url.href, { method: method, headers: new_request_headers }) let original_response_clone = original_response.clone(); let original_text = null; let response_headers = original_response.headers; let new_response_headers = new Headers(response_headers); let status = original_response.status; new_response_headers.set('cache-control' ,'public, max-age=14400') new_response_headers.set('access-control-allow-origin', '*'); new_response_headers.set('access-control-allow-credentials', true); new_response_headers.delete('content-security-policy'); new_response_headers.delete('content-security-policy-report-only'); new_response_headers.delete('clear-site-data'); const content_type = new_response_headers.get('content-type'); if (content_type.includes('text/html') && content_type.includes('UTF-8')) { original_text = await replace_response_text(original_response_clone, upstream_domain, url_host); } else { original_text = original_response_clone.body } response = new Response(original_text, { status, headers: new_response_headers }) } return response; } async function replace_response_text(response, upstream_domain, host_name) { let text = await response.text() var i, j; for (i in replace_dict) { j = replace_dict[i] if (i == '$upstream') { i = upstream_domain } else if (i == '$custom_domain') { i = host_name } if (j == '$upstream') { j = upstream_domain } else if (j == '$custom_domain') { j = host_name } let re = new RegExp(i, 'g') text = text.replace(re, j); } return text; } async function device_status (user_agent_info) { var agents = ["Android", "iPhone", "SymbianOS", "Windows Phone", "iPad", "iPod"]; var flag = true; for (var v = 0; v < agents.length; v++) { if (user_agent_info.indexOf(agents[v]) > 0) { flag = false; break; } } return flag; }然后打开链接就可以代理访问了如果需要自定义域名,直接把域名的CNAME解析到你得链接就可以。或者点击触发器,添加自定义域就可以 -
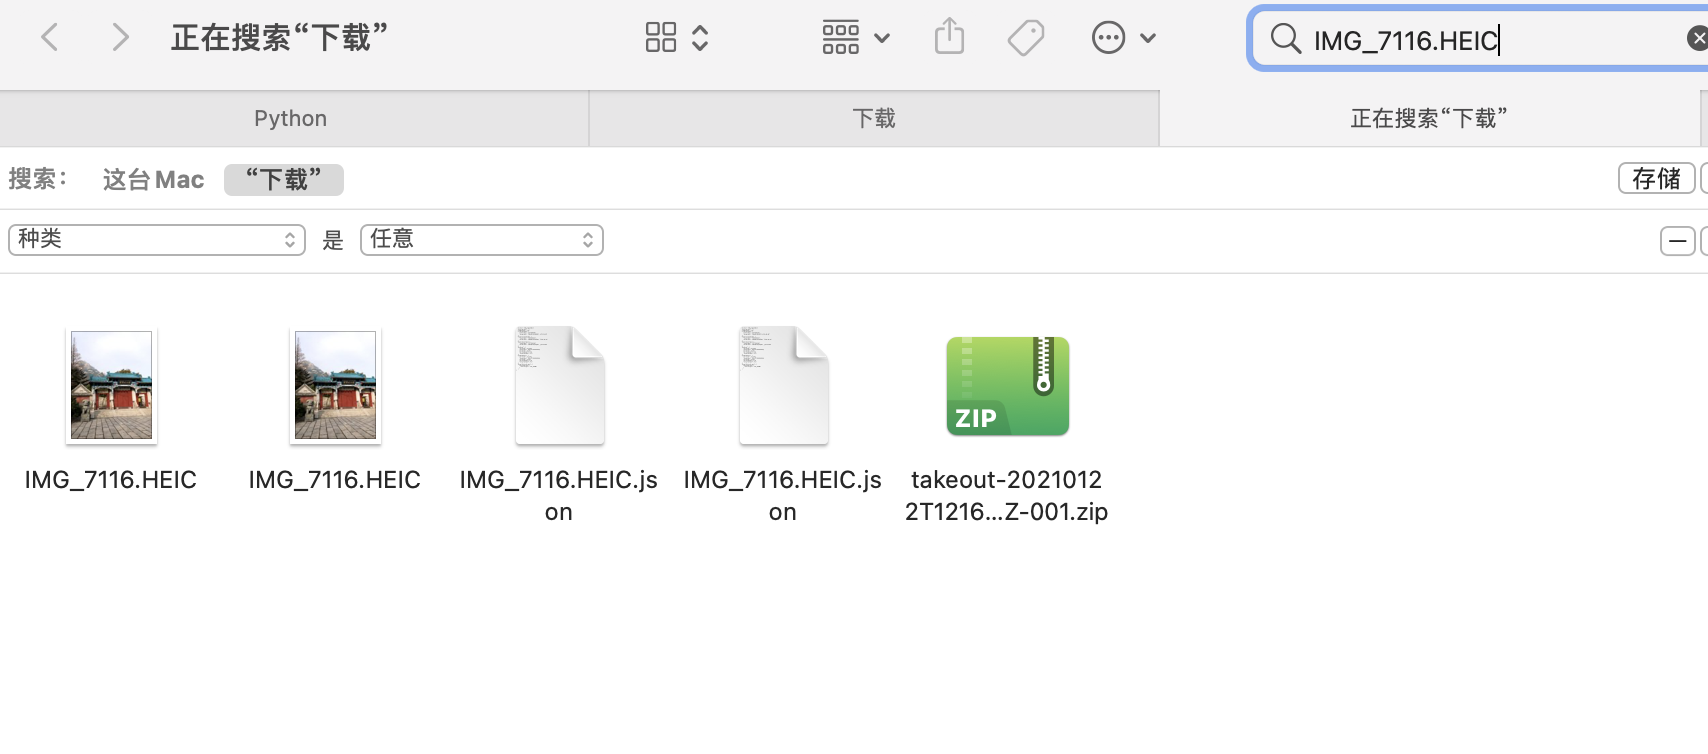
![Google相册元数据修复]() Google相册元数据修复 前提承接上一篇《如何批量导出Google相册所有数据》根据上一篇的方法导出的归档数据,往往许多信息都被抹除了,也就是Meta信息丢失,其中包括但不限于照片的定位信息(经纬度)、拍摄时间、拍照设备、光圈等一大堆信息。如果你默认下载了所有相册集,那么可能会有大量重复照片等着你,最可气的是如果你没有调整IOS设备的拍照格式的话,默认拍出的都是HEIC/HEVC格式的内容,而Google恰恰又把IOS设备默认的HEIC格式照片直接处理成了一个jpg加一个2到3秒左右的MOV短视频,如果你使用HEIC拍摄了大量照片,那可能只能一个个手动在相册选择删除。所以一般来讲,通过归档批量导出的数据,可能会遇到以下几种情况:Meta信息丢失重复时间混乱多出大量的短视频所以我一直在思考要如何处理这些问题。首先是Meta信息丢失,直接导致了我把照片直接导入相册后时间线混乱,可能我昨天拍的照片会出现在2007年那一栏中,其次往往许多照片旁边伴随着一个2秒短视频,相册一眼望过去全是重复内容,让人苦恼不堪。用Google search了一圈,发现网上有人提出问题,但是没人解决,痛定思痛,我决定写个小脚本批量处理,然后再导入手机。(最底下有完整代码,也已经放在Github上)最终实现了视频时长短于2s的,放在了under2文件夹下,短于3s的,全部放在了under3文件夹下重复文件默认被删除,包括.json和视频文件,如果代码中dealDuplicate(False),则会归类到Duplicate文件夹下根据所有.json文件修复了照片的Exif数据和日期HEIC格式相片统一放在了同名文件夹下json文件统一放在json文件夹里 脚本是python写的,没怎么用过这个语言,本着实用主义原则,代码可能并不优雅重复照片我仔细观察了一下,发现大量重复照片和视频的下载名称都相同,那就直接扫描文件夹,把重复文件剔除即可def dealDuplicate(delete=True): fileList = {} dg = os.walk(scanDir) for path,dir_list,file_list in dg: for file_name in file_list: full_file_name = os.path.join(path, file_name) if file_name == '元数据.json': continue #处理重复文件 if file_name in fileList.keys(): DupDir = scanDir + '/Duplicate/' if not os.path.exists(DupDir): os.makedirs(DupDir) if delete: os.remove(full_file_name) #这里可以直接删除 else: if not os.path.exists(DupDir + file_name): shutil.move(full_file_name, DupDir) print('重复文件:' + full_file_name + ' ------ ' + fileList[file_name]) else: fileList[file_name] = full_file_name fileList.clear()重复短视频另一个就是大量HEIC转换出来的大量短视频,都是.MOV格式文件,这里我选择通过ffmpeg判断视频时长,进而把时长在3s以内的视频过滤出来,最终全部删除有选择地分门别类。这里需要安装一下ffmpeg的扩展,pip3 install ffmpeg-python即可还有一点是需要提前安装好ffmepg可执行文件并配置好环境变量,否则有可能会报找不到ffprobe错误#文件分类 def dealClassify(): #部分文件变了,重新扫描 g = os.walk(scanDir) for path, dir_list, file_list in g: for file_name in file_list: full_file_name = os.path.join(path, file_name) #处理时长低于3s的视频 if os.path.splitext(file_name)[-1] == '.MOV': print('根据时长分类文件:' + full_file_name) info = ffmpeg.probe(full_file_name) #print(info) duration = info['format']['duration'] #时长 if float(duration) <= 2: under2Dir = scanDir + '/under2/' if not os.path.exists(under2Dir): print('创建文件夹:' + under2Dir) os.makedirs(under2Dir) if not os.path.exists(under2Dir + file_name): shutil.move(full_file_name, under2Dir) elif 2 < float(duration) <= 3: under3Dir = scanDir + '/under3/' if not os.path.exists(under3Dir): print('创建文件夹:' + under3Dir) os.makedirs(under3Dir) if not os.path.exists(under3Dir + file_name): shutil.move(full_file_name, under3Dir) #处理HEIC文件 elif os.path.splitext(file_name)[-1] == '.HEIC': heicDir = scanDir + '/HEIC/' if not os.path.exists(heicDir): os.makedirs(heicDir) if not os.path.exists(heicDir + file_name): shutil.move(full_file_name, heicDir) #单独存储json文件 elif os.path.splitext(file_name)[-1] == '.json': jsonDir = scanDir + '/json/' if not os.path.exists(jsonDir): os.makedirs(jsonDir) if not os.path.exists(jsonDir + file_name): shutil.move(full_file_name, jsonDir) #print('处理json文件:' + full_file_name) #print('json文件:' + os.path.splitext(file_name)[-2] + '.json')这里顺便筛选剔除了HEIC格式的照片,并把所有json文件单独放到一个文件夹备用修复Exif数据谷歌把每一张照片原本的 Exif 数据(e.g. 地点、日期)抹掉,然后提取出来放到了对应的 JSON 里,另外目前版本看到的格式只有xx.扩展和xx.文件扩展.json这种命名方式的Meta文件,其他格式命名的没有做处理。我这里的格式大概如下:{ "title": "IMG_4093.jpg", "description": "", "imageViews": "0", "creationTime": { "timestamp": "1525150106", "formatted": "2018年5月1日UTC 上午4:48:26" }, "modificationTime": { "timestamp": "1607202343", "formatted": "2020年12月5日UTC 下午9:05:43" }, "photoTakenTime": { "timestamp": "1485071348", "formatted": "2017年1月22日UTC 上午7:49:08" }, "geoData": { "latitude": 34.18444722222222, "longitude": 116.92279722222223, "altitude": 48.648960739030024, "latitudeSpan": 0.0, "longitudeSpan": 0.0 }, "geoDataExif": { "latitude": 34.18444722222222, "longitude": 116.92279722222223, "altitude": 48.648960739030024, "latitudeSpan": 0.0, "longitudeSpan": 0.0 }, "googlePhotosOrigin": { "mobileUpload": { "deviceType": "IOS_PHONE" } } }导出的文件中有部分是不存在.json元数据的,有些照片我的 Exif 丢了,有些照片则没丢,不清楚是否和勾选原图上传有关,所以脚本里要提前判断。我这里用了piexif和PIL库,安装方式pip3 install piexif,pip3 install Pillow。#计算lat/lng信息 def format_latlng(latlng): degree = int(latlng) res_degree = latlng - degree minute = int(res_degree * 60) res_minute = res_degree * 60 - minute seconds = round(res_minute * 60.0,3) return ((degree, 1), (minute, 1), (int(seconds * 1000), 1000)) #读json def readJson(json_file): with open(json_file, 'r') as load_f: return json.load(load_f) #处理照片exif信息 def dealExif(): g = os.walk(scanDir) for path,dir_list,file_list in g: for file_name in file_list: full_file_name = os.path.join(path, file_name) ext_name = os.path.splitext(file_name)[-1] if ext_name.lower() in ['.jpg','.jpeg','.png']: # if file_name != 'ee7db1e41afc9fd342e42e0a5034006b.JPG': # 单文件测试 # continue if not os.path.exists(scanDir + '/json/' + file_name + '.json'): continue exifJson = readJson(scanDir + '/json/' + file_name + '.json') print('处理Exif:' + full_file_name) try: img = Image.open(full_file_name) # 读图 exif_dict = piexif.load(img.info['exif']) except UnidentifiedImageError: print("图片读取失败:" + full_file_name) continue except KeyError: print("图片没有exif数据,尝试创建:" + full_file_name) exif_dict = {'0th':{},'Exif': {},'GPS': {}} # 修改exif数据 exif_dict['0th'][piexif.ImageIFD.DateTime] = time.strftime("%Y-%m-%d %H:%M:%S", time.localtime( int(exifJson['photoTakenTime']['timestamp']))).encode('utf-8') exif_dict['Exif'][piexif.ExifIFD.DateTimeOriginal] = time.strftime("%Y-%m-%d %H:%M:%S", time.localtime( int(exifJson['creationTime']['timestamp']))).encode('utf-8') exif_dict['Exif'][piexif.ExifIFD.DateTimeDigitized] = time.strftime("%Y-%m-%d %H:%M:%S", time.localtime( int(exifJson['modificationTime']['timestamp']))).encode('utf-8') exif_dict['GPS'][piexif.GPSIFD.GPSLatitude] = format_latlng(exifJson['geoDataExif']['latitude']) exif_dict['GPS'][piexif.GPSIFD.GPSLongitude] = format_latlng(exifJson['geoDataExif']['longitude']) # exif_dict['GPS'][piexif.GPSIFD.GPSLongitudeRef] = 'W' # exif_dict['GPS'][piexif.GPSIFD.GPSLatitudeRef] = 'N' exif_bytes = piexif.dump(exif_dict) img.save(full_file_name, None, exif=exif_bytes) #修改文件时间(可选) # photoTakenTime = time.strftime("%Y%m%d%H%M.%S", time.localtime(int(exifJson['photoTakenTime']['timestamp']))) # os.system('touch -t "{}" "{}"'.format(photoTakenTime, full_file_name)) # os.system('touch -mt "{}" "{}"'.format(photoTakenTime, full_file_name)) 修改下对应路径依次运行即可if __name__ == '__main__': scanDir = r'/Users/XXX/Downloads/Takeout' #TODO 这里修改归档的解压目录 dealDuplicate() dealClassify() dealExif() print('终于搞完了,Google Photos 辣鸡')总结7K多个照片视频运行了大概2分钟跑完了,最终运行一遍下来之后,多余的照片和视频已经处理掉了,那些HEIC已经被分成JPG+MOV的,程序把MOV视频剔除,所有照片已有的Exif已经修复了,代码中有一段修改文件时间的被我注释了,有条件的可以参考各自系统修改下文件时间就更好了。把一路运行下来的坑都踩了一遍,如果有什么问题我再补充好了。完整代码!注意是Python3环境也可以直接在Github上查看#!/usr/bin/python3 # -*- coding:utf-8 -*- # @Author : gty0211@foxmail.com import json import os import shutil import time import ffmpeg import piexif from PIL import Image, UnidentifiedImageError #归档zip解压目录 scanDir = '' #处理重复 def dealDuplicate(delete=True): fileList = {} dg = os.walk(scanDir) for path,dir_list,file_list in dg: for file_name in file_list: full_file_name = os.path.join(path, file_name) if file_name == '元数据.json': continue #处理重复文件 if file_name in fileList.keys(): DupDir = scanDir + '/Duplicate/' if not os.path.exists(DupDir): os.makedirs(DupDir) if delete: os.remove(full_file_name) #这里可以直接删除 else: if not os.path.exists(DupDir + file_name): shutil.move(full_file_name, DupDir) print('重复文件:' + full_file_name + ' ------ ' + fileList[file_name]) else: fileList[file_name] = full_file_name fileList.clear() #文件分类 def dealClassify(): #部分文件变了,重新扫描 g = os.walk(scanDir) for path, dir_list, file_list in g: for file_name in file_list: full_file_name = os.path.join(path, file_name) #处理时长低于3s的视频 if os.path.splitext(file_name)[-1] == '.MOV': print('根据时长分类文件:' + full_file_name) info = ffmpeg.probe(full_file_name) #print(info) duration = info['format']['duration'] #时长 if float(duration) <= 2: under2Dir = scanDir + '/under2/' if not os.path.exists(under2Dir): print('创建文件夹:' + under2Dir) os.makedirs(under2Dir) if not os.path.exists(under2Dir + file_name): shutil.move(full_file_name, under2Dir) elif 2 < float(duration) <= 3: under3Dir = scanDir + '/under3/' if not os.path.exists(under3Dir): print('创建文件夹:' + under3Dir) os.makedirs(under3Dir) if not os.path.exists(under3Dir + file_name): shutil.move(full_file_name, under3Dir) #处理HEIC文件 elif os.path.splitext(file_name)[-1] == '.HEIC': heicDir = scanDir + '/HEIC/' if not os.path.exists(heicDir): os.makedirs(heicDir) if not os.path.exists(heicDir + file_name): shutil.move(full_file_name, heicDir) #单独存储json文件 elif os.path.splitext(file_name)[-1] == '.json': jsonDir = scanDir + '/json/' if not os.path.exists(jsonDir): os.makedirs(jsonDir) if not os.path.exists(jsonDir + file_name): shutil.move(full_file_name, jsonDir) #计算lat/lng信息 def format_latlng(latlng): degree = int(latlng) res_degree = latlng - degree minute = int(res_degree * 60) res_minute = res_degree * 60 - minute seconds = round(res_minute * 60.0,3) return ((degree, 1), (minute, 1), (int(seconds * 1000), 1000)) #读json def readJson(json_file): with open(json_file, 'r') as load_f: return json.load(load_f) #处理照片exif信息 def dealExif(): g = os.walk(scanDir) for path,dir_list,file_list in g: for file_name in file_list: full_file_name = os.path.join(path, file_name) ext_name = os.path.splitext(file_name)[-1] if ext_name.lower() in ['.jpg','.jpeg','.png']: # if file_name != 'ee7db1e41afc9fd342e42e0a5034006b.JPG': # 单文件测试 # continue if not os.path.exists(scanDir + '/json/' + file_name + '.json'): continue exifJson = readJson(scanDir + '/json/' + file_name + '.json') print('处理Exif:' + full_file_name) try: img = Image.open(full_file_name) # 读图 exif_dict = piexif.load(img.info['exif']) except UnidentifiedImageError: print("图片读取失败:" + full_file_name) continue except KeyError: print("图片没有exif数据,尝试创建:" + full_file_name) exif_dict = {'0th':{},'Exif': {},'GPS': {}} # 修改exif数据 exif_dict['0th'][piexif.ImageIFD.DateTime] = time.strftime("%Y-%m-%d %H:%M:%S", time.localtime( int(exifJson['photoTakenTime']['timestamp']))).encode('utf-8') exif_dict['Exif'][piexif.ExifIFD.DateTimeOriginal] = time.strftime("%Y-%m-%d %H:%M:%S", time.localtime( int(exifJson['creationTime']['timestamp']))).encode('utf-8') exif_dict['Exif'][piexif.ExifIFD.DateTimeDigitized] = time.strftime("%Y-%m-%d %H:%M:%S", time.localtime( int(exifJson['modificationTime']['timestamp']))).encode('utf-8') exif_dict['GPS'][piexif.GPSIFD.GPSLatitude] = format_latlng(exifJson['geoDataExif']['latitude']) exif_dict['GPS'][piexif.GPSIFD.GPSLongitude] = format_latlng(exifJson['geoDataExif']['longitude']) # exif_dict['GPS'][piexif.GPSIFD.GPSLongitudeRef] = 'W' # exif_dict['GPS'][piexif.GPSIFD.GPSLatitudeRef] = 'N' exif_bytes = piexif.dump(exif_dict) img.save(full_file_name, None, exif=exif_bytes) #修改文件时间(可选) # photoTakenTime = time.strftime("%Y%m%d%H%M.%S", time.localtime(int(exifJson['photoTakenTime']['timestamp']))) # os.system('touch -t "{}" "{}"'.format(photoTakenTime, full_file_name)) # os.system('touch -mt "{}" "{}"'.format(photoTakenTime, full_file_name)) if __name__ == '__main__': scanDir = r'/Users/XXX/Downloads/Takeout' #TODO 这里修改归档的解压目录 dealDuplicate() dealClassify() dealExif() print('终于搞完了,Google Photos 辣鸡')
Google相册元数据修复 前提承接上一篇《如何批量导出Google相册所有数据》根据上一篇的方法导出的归档数据,往往许多信息都被抹除了,也就是Meta信息丢失,其中包括但不限于照片的定位信息(经纬度)、拍摄时间、拍照设备、光圈等一大堆信息。如果你默认下载了所有相册集,那么可能会有大量重复照片等着你,最可气的是如果你没有调整IOS设备的拍照格式的话,默认拍出的都是HEIC/HEVC格式的内容,而Google恰恰又把IOS设备默认的HEIC格式照片直接处理成了一个jpg加一个2到3秒左右的MOV短视频,如果你使用HEIC拍摄了大量照片,那可能只能一个个手动在相册选择删除。所以一般来讲,通过归档批量导出的数据,可能会遇到以下几种情况:Meta信息丢失重复时间混乱多出大量的短视频所以我一直在思考要如何处理这些问题。首先是Meta信息丢失,直接导致了我把照片直接导入相册后时间线混乱,可能我昨天拍的照片会出现在2007年那一栏中,其次往往许多照片旁边伴随着一个2秒短视频,相册一眼望过去全是重复内容,让人苦恼不堪。用Google search了一圈,发现网上有人提出问题,但是没人解决,痛定思痛,我决定写个小脚本批量处理,然后再导入手机。(最底下有完整代码,也已经放在Github上)最终实现了视频时长短于2s的,放在了under2文件夹下,短于3s的,全部放在了under3文件夹下重复文件默认被删除,包括.json和视频文件,如果代码中dealDuplicate(False),则会归类到Duplicate文件夹下根据所有.json文件修复了照片的Exif数据和日期HEIC格式相片统一放在了同名文件夹下json文件统一放在json文件夹里 脚本是python写的,没怎么用过这个语言,本着实用主义原则,代码可能并不优雅重复照片我仔细观察了一下,发现大量重复照片和视频的下载名称都相同,那就直接扫描文件夹,把重复文件剔除即可def dealDuplicate(delete=True): fileList = {} dg = os.walk(scanDir) for path,dir_list,file_list in dg: for file_name in file_list: full_file_name = os.path.join(path, file_name) if file_name == '元数据.json': continue #处理重复文件 if file_name in fileList.keys(): DupDir = scanDir + '/Duplicate/' if not os.path.exists(DupDir): os.makedirs(DupDir) if delete: os.remove(full_file_name) #这里可以直接删除 else: if not os.path.exists(DupDir + file_name): shutil.move(full_file_name, DupDir) print('重复文件:' + full_file_name + ' ------ ' + fileList[file_name]) else: fileList[file_name] = full_file_name fileList.clear()重复短视频另一个就是大量HEIC转换出来的大量短视频,都是.MOV格式文件,这里我选择通过ffmpeg判断视频时长,进而把时长在3s以内的视频过滤出来,最终全部删除有选择地分门别类。这里需要安装一下ffmpeg的扩展,pip3 install ffmpeg-python即可还有一点是需要提前安装好ffmepg可执行文件并配置好环境变量,否则有可能会报找不到ffprobe错误#文件分类 def dealClassify(): #部分文件变了,重新扫描 g = os.walk(scanDir) for path, dir_list, file_list in g: for file_name in file_list: full_file_name = os.path.join(path, file_name) #处理时长低于3s的视频 if os.path.splitext(file_name)[-1] == '.MOV': print('根据时长分类文件:' + full_file_name) info = ffmpeg.probe(full_file_name) #print(info) duration = info['format']['duration'] #时长 if float(duration) <= 2: under2Dir = scanDir + '/under2/' if not os.path.exists(under2Dir): print('创建文件夹:' + under2Dir) os.makedirs(under2Dir) if not os.path.exists(under2Dir + file_name): shutil.move(full_file_name, under2Dir) elif 2 < float(duration) <= 3: under3Dir = scanDir + '/under3/' if not os.path.exists(under3Dir): print('创建文件夹:' + under3Dir) os.makedirs(under3Dir) if not os.path.exists(under3Dir + file_name): shutil.move(full_file_name, under3Dir) #处理HEIC文件 elif os.path.splitext(file_name)[-1] == '.HEIC': heicDir = scanDir + '/HEIC/' if not os.path.exists(heicDir): os.makedirs(heicDir) if not os.path.exists(heicDir + file_name): shutil.move(full_file_name, heicDir) #单独存储json文件 elif os.path.splitext(file_name)[-1] == '.json': jsonDir = scanDir + '/json/' if not os.path.exists(jsonDir): os.makedirs(jsonDir) if not os.path.exists(jsonDir + file_name): shutil.move(full_file_name, jsonDir) #print('处理json文件:' + full_file_name) #print('json文件:' + os.path.splitext(file_name)[-2] + '.json')这里顺便筛选剔除了HEIC格式的照片,并把所有json文件单独放到一个文件夹备用修复Exif数据谷歌把每一张照片原本的 Exif 数据(e.g. 地点、日期)抹掉,然后提取出来放到了对应的 JSON 里,另外目前版本看到的格式只有xx.扩展和xx.文件扩展.json这种命名方式的Meta文件,其他格式命名的没有做处理。我这里的格式大概如下:{ "title": "IMG_4093.jpg", "description": "", "imageViews": "0", "creationTime": { "timestamp": "1525150106", "formatted": "2018年5月1日UTC 上午4:48:26" }, "modificationTime": { "timestamp": "1607202343", "formatted": "2020年12月5日UTC 下午9:05:43" }, "photoTakenTime": { "timestamp": "1485071348", "formatted": "2017年1月22日UTC 上午7:49:08" }, "geoData": { "latitude": 34.18444722222222, "longitude": 116.92279722222223, "altitude": 48.648960739030024, "latitudeSpan": 0.0, "longitudeSpan": 0.0 }, "geoDataExif": { "latitude": 34.18444722222222, "longitude": 116.92279722222223, "altitude": 48.648960739030024, "latitudeSpan": 0.0, "longitudeSpan": 0.0 }, "googlePhotosOrigin": { "mobileUpload": { "deviceType": "IOS_PHONE" } } }导出的文件中有部分是不存在.json元数据的,有些照片我的 Exif 丢了,有些照片则没丢,不清楚是否和勾选原图上传有关,所以脚本里要提前判断。我这里用了piexif和PIL库,安装方式pip3 install piexif,pip3 install Pillow。#计算lat/lng信息 def format_latlng(latlng): degree = int(latlng) res_degree = latlng - degree minute = int(res_degree * 60) res_minute = res_degree * 60 - minute seconds = round(res_minute * 60.0,3) return ((degree, 1), (minute, 1), (int(seconds * 1000), 1000)) #读json def readJson(json_file): with open(json_file, 'r') as load_f: return json.load(load_f) #处理照片exif信息 def dealExif(): g = os.walk(scanDir) for path,dir_list,file_list in g: for file_name in file_list: full_file_name = os.path.join(path, file_name) ext_name = os.path.splitext(file_name)[-1] if ext_name.lower() in ['.jpg','.jpeg','.png']: # if file_name != 'ee7db1e41afc9fd342e42e0a5034006b.JPG': # 单文件测试 # continue if not os.path.exists(scanDir + '/json/' + file_name + '.json'): continue exifJson = readJson(scanDir + '/json/' + file_name + '.json') print('处理Exif:' + full_file_name) try: img = Image.open(full_file_name) # 读图 exif_dict = piexif.load(img.info['exif']) except UnidentifiedImageError: print("图片读取失败:" + full_file_name) continue except KeyError: print("图片没有exif数据,尝试创建:" + full_file_name) exif_dict = {'0th':{},'Exif': {},'GPS': {}} # 修改exif数据 exif_dict['0th'][piexif.ImageIFD.DateTime] = time.strftime("%Y-%m-%d %H:%M:%S", time.localtime( int(exifJson['photoTakenTime']['timestamp']))).encode('utf-8') exif_dict['Exif'][piexif.ExifIFD.DateTimeOriginal] = time.strftime("%Y-%m-%d %H:%M:%S", time.localtime( int(exifJson['creationTime']['timestamp']))).encode('utf-8') exif_dict['Exif'][piexif.ExifIFD.DateTimeDigitized] = time.strftime("%Y-%m-%d %H:%M:%S", time.localtime( int(exifJson['modificationTime']['timestamp']))).encode('utf-8') exif_dict['GPS'][piexif.GPSIFD.GPSLatitude] = format_latlng(exifJson['geoDataExif']['latitude']) exif_dict['GPS'][piexif.GPSIFD.GPSLongitude] = format_latlng(exifJson['geoDataExif']['longitude']) # exif_dict['GPS'][piexif.GPSIFD.GPSLongitudeRef] = 'W' # exif_dict['GPS'][piexif.GPSIFD.GPSLatitudeRef] = 'N' exif_bytes = piexif.dump(exif_dict) img.save(full_file_name, None, exif=exif_bytes) #修改文件时间(可选) # photoTakenTime = time.strftime("%Y%m%d%H%M.%S", time.localtime(int(exifJson['photoTakenTime']['timestamp']))) # os.system('touch -t "{}" "{}"'.format(photoTakenTime, full_file_name)) # os.system('touch -mt "{}" "{}"'.format(photoTakenTime, full_file_name)) 修改下对应路径依次运行即可if __name__ == '__main__': scanDir = r'/Users/XXX/Downloads/Takeout' #TODO 这里修改归档的解压目录 dealDuplicate() dealClassify() dealExif() print('终于搞完了,Google Photos 辣鸡')总结7K多个照片视频运行了大概2分钟跑完了,最终运行一遍下来之后,多余的照片和视频已经处理掉了,那些HEIC已经被分成JPG+MOV的,程序把MOV视频剔除,所有照片已有的Exif已经修复了,代码中有一段修改文件时间的被我注释了,有条件的可以参考各自系统修改下文件时间就更好了。把一路运行下来的坑都踩了一遍,如果有什么问题我再补充好了。完整代码!注意是Python3环境也可以直接在Github上查看#!/usr/bin/python3 # -*- coding:utf-8 -*- # @Author : gty0211@foxmail.com import json import os import shutil import time import ffmpeg import piexif from PIL import Image, UnidentifiedImageError #归档zip解压目录 scanDir = '' #处理重复 def dealDuplicate(delete=True): fileList = {} dg = os.walk(scanDir) for path,dir_list,file_list in dg: for file_name in file_list: full_file_name = os.path.join(path, file_name) if file_name == '元数据.json': continue #处理重复文件 if file_name in fileList.keys(): DupDir = scanDir + '/Duplicate/' if not os.path.exists(DupDir): os.makedirs(DupDir) if delete: os.remove(full_file_name) #这里可以直接删除 else: if not os.path.exists(DupDir + file_name): shutil.move(full_file_name, DupDir) print('重复文件:' + full_file_name + ' ------ ' + fileList[file_name]) else: fileList[file_name] = full_file_name fileList.clear() #文件分类 def dealClassify(): #部分文件变了,重新扫描 g = os.walk(scanDir) for path, dir_list, file_list in g: for file_name in file_list: full_file_name = os.path.join(path, file_name) #处理时长低于3s的视频 if os.path.splitext(file_name)[-1] == '.MOV': print('根据时长分类文件:' + full_file_name) info = ffmpeg.probe(full_file_name) #print(info) duration = info['format']['duration'] #时长 if float(duration) <= 2: under2Dir = scanDir + '/under2/' if not os.path.exists(under2Dir): print('创建文件夹:' + under2Dir) os.makedirs(under2Dir) if not os.path.exists(under2Dir + file_name): shutil.move(full_file_name, under2Dir) elif 2 < float(duration) <= 3: under3Dir = scanDir + '/under3/' if not os.path.exists(under3Dir): print('创建文件夹:' + under3Dir) os.makedirs(under3Dir) if not os.path.exists(under3Dir + file_name): shutil.move(full_file_name, under3Dir) #处理HEIC文件 elif os.path.splitext(file_name)[-1] == '.HEIC': heicDir = scanDir + '/HEIC/' if not os.path.exists(heicDir): os.makedirs(heicDir) if not os.path.exists(heicDir + file_name): shutil.move(full_file_name, heicDir) #单独存储json文件 elif os.path.splitext(file_name)[-1] == '.json': jsonDir = scanDir + '/json/' if not os.path.exists(jsonDir): os.makedirs(jsonDir) if not os.path.exists(jsonDir + file_name): shutil.move(full_file_name, jsonDir) #计算lat/lng信息 def format_latlng(latlng): degree = int(latlng) res_degree = latlng - degree minute = int(res_degree * 60) res_minute = res_degree * 60 - minute seconds = round(res_minute * 60.0,3) return ((degree, 1), (minute, 1), (int(seconds * 1000), 1000)) #读json def readJson(json_file): with open(json_file, 'r') as load_f: return json.load(load_f) #处理照片exif信息 def dealExif(): g = os.walk(scanDir) for path,dir_list,file_list in g: for file_name in file_list: full_file_name = os.path.join(path, file_name) ext_name = os.path.splitext(file_name)[-1] if ext_name.lower() in ['.jpg','.jpeg','.png']: # if file_name != 'ee7db1e41afc9fd342e42e0a5034006b.JPG': # 单文件测试 # continue if not os.path.exists(scanDir + '/json/' + file_name + '.json'): continue exifJson = readJson(scanDir + '/json/' + file_name + '.json') print('处理Exif:' + full_file_name) try: img = Image.open(full_file_name) # 读图 exif_dict = piexif.load(img.info['exif']) except UnidentifiedImageError: print("图片读取失败:" + full_file_name) continue except KeyError: print("图片没有exif数据,尝试创建:" + full_file_name) exif_dict = {'0th':{},'Exif': {},'GPS': {}} # 修改exif数据 exif_dict['0th'][piexif.ImageIFD.DateTime] = time.strftime("%Y-%m-%d %H:%M:%S", time.localtime( int(exifJson['photoTakenTime']['timestamp']))).encode('utf-8') exif_dict['Exif'][piexif.ExifIFD.DateTimeOriginal] = time.strftime("%Y-%m-%d %H:%M:%S", time.localtime( int(exifJson['creationTime']['timestamp']))).encode('utf-8') exif_dict['Exif'][piexif.ExifIFD.DateTimeDigitized] = time.strftime("%Y-%m-%d %H:%M:%S", time.localtime( int(exifJson['modificationTime']['timestamp']))).encode('utf-8') exif_dict['GPS'][piexif.GPSIFD.GPSLatitude] = format_latlng(exifJson['geoDataExif']['latitude']) exif_dict['GPS'][piexif.GPSIFD.GPSLongitude] = format_latlng(exifJson['geoDataExif']['longitude']) # exif_dict['GPS'][piexif.GPSIFD.GPSLongitudeRef] = 'W' # exif_dict['GPS'][piexif.GPSIFD.GPSLatitudeRef] = 'N' exif_bytes = piexif.dump(exif_dict) img.save(full_file_name, None, exif=exif_bytes) #修改文件时间(可选) # photoTakenTime = time.strftime("%Y%m%d%H%M.%S", time.localtime(int(exifJson['photoTakenTime']['timestamp']))) # os.system('touch -t "{}" "{}"'.format(photoTakenTime, full_file_name)) # os.system('touch -mt "{}" "{}"'.format(photoTakenTime, full_file_name)) if __name__ == '__main__': scanDir = r'/Users/XXX/Downloads/Takeout' #TODO 这里修改归档的解压目录 dealDuplicate() dealClassify() dealExif() print('终于搞完了,Google Photos 辣鸡') -
![wkhtmltopdf中文参数详解]() wkhtmltopdf中文参数详解 wkhtmltopdf [OPTIONS]... <input file> [More input files] <output file> 常规选项 --allow <path> 允许加载从指定的文件夹中的文件或文件(可重复) --book* 设置一会打印一本书的时候,通常设置的选项 --collate 打印多份副本时整理 --cookie <name> <value> 设置一个额外的cookie(可重复) --cookie-jar <path> 读取和写入的Cookie,并在提供的cookie jar文件 --copies <number> 复印打印成pdf文件数(默认为1) --cover* <url> 使用HTML文件作为封面。它会带页眉和页脚的TOC之前插入 --custom-header <name> <value> 设置一个附加的HTTP头(可重复) --debug-javascript 显示的javascript调试输出 --default-header* 添加一个缺省的头部,与页面的左边的名称,页面数到右边,例如: --header-left '[webpage]' --header-right '[page]/[toPage]' --header-line --disable-external-links* 禁止生成链接到远程网页 --disable-internal-links* 禁止使用本地链接 --disable-javascript 禁止让网页执行JavaScript --disable-pdf-compression* 禁止在PDF对象使用无损压缩 --disable-smart-shrinking* 禁止使用WebKit的智能战略收缩,使像素/ DPI比没有不变 --disallow-local-file-access 禁止允许转换的本地文件读取其他本地文件,除非explecitily允许用 --allow --dpi <dpi> 显式更改DPI(这对基于X11的系统没有任何影响) --enable-plugins 启用已安装的插件(如Flash --encoding <encoding> 设置默认的文字编码 --extended-help 显示更广泛的帮助,详细介绍了不常见的命令开关 --forms* 打开HTML表单字段转换为PDF表单域 --grayscale PDF格式将在灰阶产生 --help Display help --htmldoc 输出程序HTML帮助 --ignore-load-errors 忽略claimes加载过程中已经遇到了一个错误页面 --lowquality 产生低品质的PDF/ PS。有用缩小结果文档的空间 --manpage 输出程序手册页 --margin-bottom <unitreal> 设置页面下边距 (default 10mm) --margin-left <unitreal> 将左边页边距 (default 10mm) --margin-right <unitreal> 设置页面右边距 (default 10mm) --margin-top <unitreal> 设置页面上边距 (default 10mm) --minimum-font-size <int> 最小字体大小 (default 5) --no-background 不打印背景 --orientation <orientation> 设置方向为横向或纵向 --page-height <unitreal> 页面高度 (default unit millimeter) --page-offset* <offset> 设置起始页码 (default 1) --page-size <size> 设置纸张大小: A4, Letter, etc. --page-width <unitreal> 页面宽度 (default unit millimeter) --password <password> HTTP验证密码 --post <name> <value> Add an additional post field (repeatable) --post-file <name> <path> Post an aditional file (repeatable) --print-media-type* 使用的打印介质类型,而不是屏幕 --proxy <proxy> 使用代理 --quiet Be less verbose --read-args-from-stdin 读取标准输入的命令行参数 --readme 输出程序自述 --redirect-delay <msec> 等待几毫秒为JS-重定向(default 200) --replace* <name> <value> 替换名称,值的页眉和页脚(可重复) --stop-slow-scripts 停止运行缓慢的JavaScripts --title <text> 生成的PDF文件的标题(第一个文档的标题使用,如果没有指定) --toc* 插入的内容的表中的文件的开头 --use-xserver* 使用X服务器(一些插件和其他的东西没有X11可能无法正常工作) --user-style-sheet <url> 指定用户的样式表,加载在每一页中 --username <username> HTTP认证的用户名 --version 输出版本信息退出 --zoom <float> 使用这个缩放因子 (default 1) 页眉和页脚选项 --header-center* <text> (设置在中心位置的页眉内容) --header-font-name* <name> (default Arial) (设置页眉的字体名称) --header-font-size* <size> (设置页眉的字体大小) --header-html* <url> (添加一个HTML页眉,后面是网址) --header-left* <text> (左对齐的页眉文本) --header-line* (显示一条线在页眉下) --header-right* <text> (右对齐页眉文本) --header-spacing* <real> (设置页眉和内容的距离,默认0) --footer-center* <text> (设置在中心位置的页脚内容) --footer-font-name* <name> (设置页脚的字体名称) --footer-font-size* <size> (设置页脚的字体大小default 11) --footer-html* <url> (添加一个HTML页脚,后面是网址) --footer-left* <text> (左对齐的页脚文本) --footer-line* 显示一条线在页脚内容上) --footer-right* <text> (右对齐页脚文本) --footer-spacing* <real> (设置页脚和内容的距离) ./wkhtmltopdf --footer-right '[page]/[topage]' http://www.baidu.com baidu.pdf ./wkhtmltopdf --header-center '报表' --header-line --margin-top 2cm --header-line http://192.168.212.139/oma/ oma.pdf 表内容选项中 --toc-depth* <level> Set the depth of the toc (default 3) --toc-disable-back-links* Do not link from section header to toc --toc-disable-links* Do not link from toc to sections --toc-font-name* <name> Set the font used for the toc (default Arial) --toc-header-font-name* <name> The font of the toc header (if unset use --toc-font-name) --toc-header-font-size* <size> The font size of the toc header (default 15) --toc-header-text* <text> The header text of the toc (default Table Of Contents) --toc-l1-font-size* <size> Set the font size on level 1 of the toc (default 12) --toc-l1-indentation* <num> Set indentation on level 1 of the toc (default 0) --toc-l2-font-size* <size> Set the font size on level 2 of the toc (default 10) --toc-l2-indentation* <num> Set indentation on level 2 of the toc (default 20) --toc-l3-font-size* <size> Set the font size on level 3 of the toc (default 8) --toc-l3-indentation* <num> Set indentation on level 3 of the toc (default 40) --toc-l4-font-size* <size> Set the font size on level 4 of the toc (default 6) --toc-l4-indentation* <num> Set indentation on level 4 of the toc (default 60) --toc-l5-font-size* <size> Set the font size on level 5 of the toc (default 4) --toc-l5-indentation* <num> Set indentation on level 5 of the toc (default 80) --toc-l6-font-size* <size> Set the font size on level 6 of the toc (default 2) --toc-l6-indentation* <num> Set indentation on level 6 of the toc (default 100) --toc-l7-font-size* <size> Set the font size on level 7 of the toc (default 0) --toc-l7-indentation* <num> Set indentation on level 7 of the toc (default 120) --toc-no-dots* Do not use dots, in the toc 轮廓选项 --dump-outline <file> 转储目录到一个文件 --outline 显示目录(文章中h1,h2来定) --outline-depth <level> 设置目录的深度(默认为4) 页脚和页眉 * [page] 由当前正在打印的页的数目代替 * [frompage] 由要打印的第一页的数量取代 * [topage] 由最后一页要打印的数量取代 * [webpage] 通过正在打印的页面的URL替换 * [section] 由当前节的名称替换 * [subsection] 由当前小节的名称替换 * [date] 由当前日期系统的本地格式取代 * [time] 由当前时间,系统的本地格式取代 ./wkhtmltopdf --footer-right '[page]/[topage]' http://www.baidu.com baidu.pdf ./wkhtmltopdf --header-center '报表' --outline --header-line --margin-top 2cm --header-line http://www.hao123.com/ hao123.pdf ./wkhtmltopdf --header-left '[webpage]' --footer-center '测试([page]/[toPage])' http://www.baidu.com baidu.pdf
wkhtmltopdf中文参数详解 wkhtmltopdf [OPTIONS]... <input file> [More input files] <output file> 常规选项 --allow <path> 允许加载从指定的文件夹中的文件或文件(可重复) --book* 设置一会打印一本书的时候,通常设置的选项 --collate 打印多份副本时整理 --cookie <name> <value> 设置一个额外的cookie(可重复) --cookie-jar <path> 读取和写入的Cookie,并在提供的cookie jar文件 --copies <number> 复印打印成pdf文件数(默认为1) --cover* <url> 使用HTML文件作为封面。它会带页眉和页脚的TOC之前插入 --custom-header <name> <value> 设置一个附加的HTTP头(可重复) --debug-javascript 显示的javascript调试输出 --default-header* 添加一个缺省的头部,与页面的左边的名称,页面数到右边,例如: --header-left '[webpage]' --header-right '[page]/[toPage]' --header-line --disable-external-links* 禁止生成链接到远程网页 --disable-internal-links* 禁止使用本地链接 --disable-javascript 禁止让网页执行JavaScript --disable-pdf-compression* 禁止在PDF对象使用无损压缩 --disable-smart-shrinking* 禁止使用WebKit的智能战略收缩,使像素/ DPI比没有不变 --disallow-local-file-access 禁止允许转换的本地文件读取其他本地文件,除非explecitily允许用 --allow --dpi <dpi> 显式更改DPI(这对基于X11的系统没有任何影响) --enable-plugins 启用已安装的插件(如Flash --encoding <encoding> 设置默认的文字编码 --extended-help 显示更广泛的帮助,详细介绍了不常见的命令开关 --forms* 打开HTML表单字段转换为PDF表单域 --grayscale PDF格式将在灰阶产生 --help Display help --htmldoc 输出程序HTML帮助 --ignore-load-errors 忽略claimes加载过程中已经遇到了一个错误页面 --lowquality 产生低品质的PDF/ PS。有用缩小结果文档的空间 --manpage 输出程序手册页 --margin-bottom <unitreal> 设置页面下边距 (default 10mm) --margin-left <unitreal> 将左边页边距 (default 10mm) --margin-right <unitreal> 设置页面右边距 (default 10mm) --margin-top <unitreal> 设置页面上边距 (default 10mm) --minimum-font-size <int> 最小字体大小 (default 5) --no-background 不打印背景 --orientation <orientation> 设置方向为横向或纵向 --page-height <unitreal> 页面高度 (default unit millimeter) --page-offset* <offset> 设置起始页码 (default 1) --page-size <size> 设置纸张大小: A4, Letter, etc. --page-width <unitreal> 页面宽度 (default unit millimeter) --password <password> HTTP验证密码 --post <name> <value> Add an additional post field (repeatable) --post-file <name> <path> Post an aditional file (repeatable) --print-media-type* 使用的打印介质类型,而不是屏幕 --proxy <proxy> 使用代理 --quiet Be less verbose --read-args-from-stdin 读取标准输入的命令行参数 --readme 输出程序自述 --redirect-delay <msec> 等待几毫秒为JS-重定向(default 200) --replace* <name> <value> 替换名称,值的页眉和页脚(可重复) --stop-slow-scripts 停止运行缓慢的JavaScripts --title <text> 生成的PDF文件的标题(第一个文档的标题使用,如果没有指定) --toc* 插入的内容的表中的文件的开头 --use-xserver* 使用X服务器(一些插件和其他的东西没有X11可能无法正常工作) --user-style-sheet <url> 指定用户的样式表,加载在每一页中 --username <username> HTTP认证的用户名 --version 输出版本信息退出 --zoom <float> 使用这个缩放因子 (default 1) 页眉和页脚选项 --header-center* <text> (设置在中心位置的页眉内容) --header-font-name* <name> (default Arial) (设置页眉的字体名称) --header-font-size* <size> (设置页眉的字体大小) --header-html* <url> (添加一个HTML页眉,后面是网址) --header-left* <text> (左对齐的页眉文本) --header-line* (显示一条线在页眉下) --header-right* <text> (右对齐页眉文本) --header-spacing* <real> (设置页眉和内容的距离,默认0) --footer-center* <text> (设置在中心位置的页脚内容) --footer-font-name* <name> (设置页脚的字体名称) --footer-font-size* <size> (设置页脚的字体大小default 11) --footer-html* <url> (添加一个HTML页脚,后面是网址) --footer-left* <text> (左对齐的页脚文本) --footer-line* 显示一条线在页脚内容上) --footer-right* <text> (右对齐页脚文本) --footer-spacing* <real> (设置页脚和内容的距离) ./wkhtmltopdf --footer-right '[page]/[topage]' http://www.baidu.com baidu.pdf ./wkhtmltopdf --header-center '报表' --header-line --margin-top 2cm --header-line http://192.168.212.139/oma/ oma.pdf 表内容选项中 --toc-depth* <level> Set the depth of the toc (default 3) --toc-disable-back-links* Do not link from section header to toc --toc-disable-links* Do not link from toc to sections --toc-font-name* <name> Set the font used for the toc (default Arial) --toc-header-font-name* <name> The font of the toc header (if unset use --toc-font-name) --toc-header-font-size* <size> The font size of the toc header (default 15) --toc-header-text* <text> The header text of the toc (default Table Of Contents) --toc-l1-font-size* <size> Set the font size on level 1 of the toc (default 12) --toc-l1-indentation* <num> Set indentation on level 1 of the toc (default 0) --toc-l2-font-size* <size> Set the font size on level 2 of the toc (default 10) --toc-l2-indentation* <num> Set indentation on level 2 of the toc (default 20) --toc-l3-font-size* <size> Set the font size on level 3 of the toc (default 8) --toc-l3-indentation* <num> Set indentation on level 3 of the toc (default 40) --toc-l4-font-size* <size> Set the font size on level 4 of the toc (default 6) --toc-l4-indentation* <num> Set indentation on level 4 of the toc (default 60) --toc-l5-font-size* <size> Set the font size on level 5 of the toc (default 4) --toc-l5-indentation* <num> Set indentation on level 5 of the toc (default 80) --toc-l6-font-size* <size> Set the font size on level 6 of the toc (default 2) --toc-l6-indentation* <num> Set indentation on level 6 of the toc (default 100) --toc-l7-font-size* <size> Set the font size on level 7 of the toc (default 0) --toc-l7-indentation* <num> Set indentation on level 7 of the toc (default 120) --toc-no-dots* Do not use dots, in the toc 轮廓选项 --dump-outline <file> 转储目录到一个文件 --outline 显示目录(文章中h1,h2来定) --outline-depth <level> 设置目录的深度(默认为4) 页脚和页眉 * [page] 由当前正在打印的页的数目代替 * [frompage] 由要打印的第一页的数量取代 * [topage] 由最后一页要打印的数量取代 * [webpage] 通过正在打印的页面的URL替换 * [section] 由当前节的名称替换 * [subsection] 由当前小节的名称替换 * [date] 由当前日期系统的本地格式取代 * [time] 由当前时间,系统的本地格式取代 ./wkhtmltopdf --footer-right '[page]/[topage]' http://www.baidu.com baidu.pdf ./wkhtmltopdf --header-center '报表' --outline --header-line --margin-top 2cm --header-line http://www.hao123.com/ hao123.pdf ./wkhtmltopdf --header-left '[webpage]' --footer-center '测试([page]/[toPage])' http://www.baidu.com baidu.pdf -
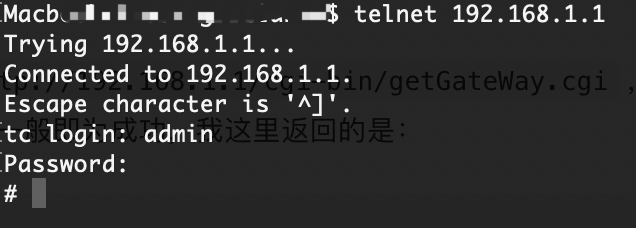
![关于破解移动宽带光猫 型号: GS3101 超级管理员密码]() 关于破解移动宽带光猫 型号: GS3101 超级管理员密码 1. 普通用户登陆路由器打开路由器管理地址192.168.1.1,先使用路由器后面的账号密码如user,cnb28登陆到路由器中。2.打开路由器Telnet登陆路由器之后打开这个地址http://192.168.1.1/cgi-bin/getGateWay.cgi,用于打开路由器Telnet功能,页面返回Yes字样一般即为成功,我这里返回的是:Family GateWay Yes3.连接Telnet打开成功后使用Telnet连接工具连接到路由器telnet 192.168.1.1然后输入账号密码admin s2@We3%Dc#登陆后界面一般显示#就是成功4.查看密码登陆成功后输入cat /tmp/ctromfile.cfg | grep 'Admin' 就可以查看超级管理员的密码如我这里返回# cat /tmp/ctromfile.cfg | grep 'Admin' <Entry0 Active="Yes" username="CMCCAdmin" web_passwd="CMCCAdminURaSB" display_mask="FF FF FF FF EF DF FF FF FF"其中的username=后面的就是管理员账号,一般为CMCCAdmin,web_passwd=后面的就是密码,这里对应的是CMCCAdminURaSB,注意不要带引号。5.完成然后打开192.168.1.1重新登陆就可以看到管理员的界面啦!
关于破解移动宽带光猫 型号: GS3101 超级管理员密码 1. 普通用户登陆路由器打开路由器管理地址192.168.1.1,先使用路由器后面的账号密码如user,cnb28登陆到路由器中。2.打开路由器Telnet登陆路由器之后打开这个地址http://192.168.1.1/cgi-bin/getGateWay.cgi,用于打开路由器Telnet功能,页面返回Yes字样一般即为成功,我这里返回的是:Family GateWay Yes3.连接Telnet打开成功后使用Telnet连接工具连接到路由器telnet 192.168.1.1然后输入账号密码admin s2@We3%Dc#登陆后界面一般显示#就是成功4.查看密码登陆成功后输入cat /tmp/ctromfile.cfg | grep 'Admin' 就可以查看超级管理员的密码如我这里返回# cat /tmp/ctromfile.cfg | grep 'Admin' <Entry0 Active="Yes" username="CMCCAdmin" web_passwd="CMCCAdminURaSB" display_mask="FF FF FF FF EF DF FF FF FF"其中的username=后面的就是管理员账号,一般为CMCCAdmin,web_passwd=后面的就是密码,这里对应的是CMCCAdminURaSB,注意不要带引号。5.完成然后打开192.168.1.1重新登陆就可以看到管理员的界面啦! -
![Js实现复制到剪切板]() Js实现复制到剪切板 网上看了一堆剪切板复制,都是这个抄那个,写的什么玩意,没一个能用的,越看越乱。这里实现复制到剪切板需要引入外部 js clipboard.js。先引入js,这个js需要在HTML前面引入<script src="http://lib.baomitu.com/clipboard.js/1.7.1/clipboard.min.js"></script>Html,比如实现点击Button复制内容<button id="copy_id" data-clipboard-text="要复制的内容" >复制链接</button>自己的js代码,这里是实现js复制到剪切板以及之后的流程代码<script type="text/javascript"> var clipboard = new Clipboard('#copy_id'); // 获取要监听的剪切元素 clipboard.on('success', function (e) { //这里处理复制成功后的方法 alert("复制成功"); }); clipboard.on('error', function(e) { //复制失败 alert("复制失败"); }); </script>到这里复制就完成了,至少Chrome可用
Js实现复制到剪切板 网上看了一堆剪切板复制,都是这个抄那个,写的什么玩意,没一个能用的,越看越乱。这里实现复制到剪切板需要引入外部 js clipboard.js。先引入js,这个js需要在HTML前面引入<script src="http://lib.baomitu.com/clipboard.js/1.7.1/clipboard.min.js"></script>Html,比如实现点击Button复制内容<button id="copy_id" data-clipboard-text="要复制的内容" >复制链接</button>自己的js代码,这里是实现js复制到剪切板以及之后的流程代码<script type="text/javascript"> var clipboard = new Clipboard('#copy_id'); // 获取要监听的剪切元素 clipboard.on('success', function (e) { //这里处理复制成功后的方法 alert("复制成功"); }); clipboard.on('error', function(e) { //复制失败 alert("复制失败"); }); </script>到这里复制就完成了,至少Chrome可用 -
![小程序简单封装网络请求和上传方法]() 小程序简单封装网络请求和上传方法 微信小程序的请求方法一直比较复杂,每次调用都要重写一遍,感觉效率很低,于是想简单封装一下,看起来美观一点点。首先可以在小程序默认的utils/文件夹下新建一个common.js类,然后在common.js里写上一些常用的方法。比如封装一个网络请求,可以用这种/*封装Post请求方法 */ function curl_post (url, data, resolve, reject) { wx.request({ url: url, data: data, header: { //'Content-Type': 'application/json' 'content-type': 'application/x-www-form-urlencoded' }, method: 'POST', dataType: 'json', responseType: 'text', success: function (res) { console.log("curl_post成功,返回结果:") if (res.statusCode == 200) { console.log(res.data) resolve(res.data) // 成功回调 } else { console.log(res) resolve(res.errMsg) } }, fail: function (res) { console.log("curl_post失败,返回结果:") console.log(res) reject(res) }, complete: function (res) { }, }) }默认是使用的Post方法,也可以增加一个参数变成GET,每次调用的时候,把url和data传进去,然后直接在回调函数里操作数据就可以。调用示例: var common = require("../../utils/common.js"); // 引入common方法,注意只能使用相对路径 // 执行调用 var PostUrl = "http://note.coccoo.cc"; // 要请求的url var PostData = { name: "Mic" , age: 12 }; // 请求数据,使用json格式 // 发送请求 var app = getApp(); app.fnuo_post(PostUrl, PostData, function(res){ // 请求成功后调用的函数,res为返回的数据 // 在这里做你想做的事 console.log(res); },function(res){ // 请求失败调用的方法,可以弹出一些操作 console.log(res.errorMsg); });上传文件的方法与之类似,就不单独说了,只是要注意下上传文件后返回的数据默认是没有经过Json解析的下面直接给出整个common.js的示例:/*封装Post请求方法 */ function curl_post (url, data, resolve, reject) { wx.request({ url: url, data: data, header: { //'Content-Type': 'application/json' 'content-type': 'application/x-www-form-urlencoded' }, method: 'POST', dataType: 'json', responseType: 'text', success: function (res) { console.log("curl_post成功,返回结果:") if (res.statusCode == 200) { console.log(res.data) resolve(res.data) // 成功回调 } else { console.log(res) resolve(res.errMsg) } }, fail: function (res) { console.log("curl_post失败,返回结果:") console.log(res) reject(res) }, complete: function (res) { }, }) } /* 封装Upload方法 */ function curl_upload(url, path, name, formData, resolve, reject){ wx.uploadFile({ url: url, filePath: path, name: name, formData: formData, success: function (res) { var data = res.data console.log("upload成功,返回结果:") console.log(res) // 注意这里的res一般是字符串,没有经过json解析,需要你手动解析一遍 resolve(res) }, fail: function (res) { reject(res) } }) } /* 时间戳转换时间 */ Date.prototype.format = function (format) { var date = { "M+": this.getMonth() + 1, "d+": this.getDate(), "h+": this.getHours(), "m+": this.getMinutes(), "s+": this.getSeconds(), "q+": Math.floor((this.getMonth() + 3) / 3), "S+": this.getMilliseconds() }; if (/(y+)/i.test(format)) { format = format.replace(RegExp.$1, (this.getFullYear() + '').substr(4 - RegExp.$1.length)); } for (var k in date) { if (new RegExp("(" + k + ")").test(format)) { format = format.replace(RegExp.$1, RegExp.$1.length == 1 ? date[k] : ("00" + date[k]).substr(("" + date[k]).length)); } } return format; } // 这里是正式调用时间戳转时间的方法,可以修改format达到你想要的效果,或者直接 function timeToDate(timeStamp, format = 'yyyy-MM-dd') { var timestamp3 = timeStamp; var newDate = new Date(); newDate.setTime(timestamp3 * 1000); return newDate.format(format); } // 错误信息提示框 function errorMsgDialog(msg){ wx.showToast({ // 失败原因 title: msg, icon: "none", }) } // 正确信息提示框 function msgDialog(msg){ wx.showToast({ title: msg, icon:"success", }) } module.exports.curl_post = curl_post module.exports.curl_upload = curl_upload module.exports.timeToDate = timeToDate module.exports.msgDialog = msgDialog module.exports.errorMsgDialog = errorMsgDialog // var common = require('common.js') // require 暂不支持绝对路径比如我的目录是这样:pagesindexindex.jsuntilscommon.js如果我想在index.js中调用common.js时,只能使用../../untils/common.js这样相对路径来引用调用示例:var common = require("../../utils/common.js"); // 引入common方法 // 调用Post请求方法 var PostUrl = "http://note.coccoo.cc"; // 要请求的url var PostData = { name: "Mic" , age: 12 }; // 请求数据,使用json格式 // 发送请求 app.fnuo_post(PostUrl, PostData, function(res){ // 请求成功后调用的函数,res为返回的数据 // 在这里做你想做的事 console.log(res); },function(res){ // 请求失败调用的方法,可以弹出一些操作 console.log(res.errorMsg); }); // 调用上传文件方法,以上传图片做示例 // 调用小程序选择图片 wx.chooseImage({ success: function (res) { var tempFilePaths = res.tempFilePaths var UploadUrl = "http://note.coccoo.cc/upload"; // 你要上传到的地址 // 公共上传方法 app.curl_upload(UploadUrl, tempFilePaths[0], 'img', {}, function (res) { var data = JSON.parse(res.data) // 一般需要解析json common.msgDialog("上传成功"); }, function (res) { common.errorMsgDialog(res.errorMsg); } ); } })以上
小程序简单封装网络请求和上传方法 微信小程序的请求方法一直比较复杂,每次调用都要重写一遍,感觉效率很低,于是想简单封装一下,看起来美观一点点。首先可以在小程序默认的utils/文件夹下新建一个common.js类,然后在common.js里写上一些常用的方法。比如封装一个网络请求,可以用这种/*封装Post请求方法 */ function curl_post (url, data, resolve, reject) { wx.request({ url: url, data: data, header: { //'Content-Type': 'application/json' 'content-type': 'application/x-www-form-urlencoded' }, method: 'POST', dataType: 'json', responseType: 'text', success: function (res) { console.log("curl_post成功,返回结果:") if (res.statusCode == 200) { console.log(res.data) resolve(res.data) // 成功回调 } else { console.log(res) resolve(res.errMsg) } }, fail: function (res) { console.log("curl_post失败,返回结果:") console.log(res) reject(res) }, complete: function (res) { }, }) }默认是使用的Post方法,也可以增加一个参数变成GET,每次调用的时候,把url和data传进去,然后直接在回调函数里操作数据就可以。调用示例: var common = require("../../utils/common.js"); // 引入common方法,注意只能使用相对路径 // 执行调用 var PostUrl = "http://note.coccoo.cc"; // 要请求的url var PostData = { name: "Mic" , age: 12 }; // 请求数据,使用json格式 // 发送请求 var app = getApp(); app.fnuo_post(PostUrl, PostData, function(res){ // 请求成功后调用的函数,res为返回的数据 // 在这里做你想做的事 console.log(res); },function(res){ // 请求失败调用的方法,可以弹出一些操作 console.log(res.errorMsg); });上传文件的方法与之类似,就不单独说了,只是要注意下上传文件后返回的数据默认是没有经过Json解析的下面直接给出整个common.js的示例:/*封装Post请求方法 */ function curl_post (url, data, resolve, reject) { wx.request({ url: url, data: data, header: { //'Content-Type': 'application/json' 'content-type': 'application/x-www-form-urlencoded' }, method: 'POST', dataType: 'json', responseType: 'text', success: function (res) { console.log("curl_post成功,返回结果:") if (res.statusCode == 200) { console.log(res.data) resolve(res.data) // 成功回调 } else { console.log(res) resolve(res.errMsg) } }, fail: function (res) { console.log("curl_post失败,返回结果:") console.log(res) reject(res) }, complete: function (res) { }, }) } /* 封装Upload方法 */ function curl_upload(url, path, name, formData, resolve, reject){ wx.uploadFile({ url: url, filePath: path, name: name, formData: formData, success: function (res) { var data = res.data console.log("upload成功,返回结果:") console.log(res) // 注意这里的res一般是字符串,没有经过json解析,需要你手动解析一遍 resolve(res) }, fail: function (res) { reject(res) } }) } /* 时间戳转换时间 */ Date.prototype.format = function (format) { var date = { "M+": this.getMonth() + 1, "d+": this.getDate(), "h+": this.getHours(), "m+": this.getMinutes(), "s+": this.getSeconds(), "q+": Math.floor((this.getMonth() + 3) / 3), "S+": this.getMilliseconds() }; if (/(y+)/i.test(format)) { format = format.replace(RegExp.$1, (this.getFullYear() + '').substr(4 - RegExp.$1.length)); } for (var k in date) { if (new RegExp("(" + k + ")").test(format)) { format = format.replace(RegExp.$1, RegExp.$1.length == 1 ? date[k] : ("00" + date[k]).substr(("" + date[k]).length)); } } return format; } // 这里是正式调用时间戳转时间的方法,可以修改format达到你想要的效果,或者直接 function timeToDate(timeStamp, format = 'yyyy-MM-dd') { var timestamp3 = timeStamp; var newDate = new Date(); newDate.setTime(timestamp3 * 1000); return newDate.format(format); } // 错误信息提示框 function errorMsgDialog(msg){ wx.showToast({ // 失败原因 title: msg, icon: "none", }) } // 正确信息提示框 function msgDialog(msg){ wx.showToast({ title: msg, icon:"success", }) } module.exports.curl_post = curl_post module.exports.curl_upload = curl_upload module.exports.timeToDate = timeToDate module.exports.msgDialog = msgDialog module.exports.errorMsgDialog = errorMsgDialog // var common = require('common.js') // require 暂不支持绝对路径比如我的目录是这样:pagesindexindex.jsuntilscommon.js如果我想在index.js中调用common.js时,只能使用../../untils/common.js这样相对路径来引用调用示例:var common = require("../../utils/common.js"); // 引入common方法 // 调用Post请求方法 var PostUrl = "http://note.coccoo.cc"; // 要请求的url var PostData = { name: "Mic" , age: 12 }; // 请求数据,使用json格式 // 发送请求 app.fnuo_post(PostUrl, PostData, function(res){ // 请求成功后调用的函数,res为返回的数据 // 在这里做你想做的事 console.log(res); },function(res){ // 请求失败调用的方法,可以弹出一些操作 console.log(res.errorMsg); }); // 调用上传文件方法,以上传图片做示例 // 调用小程序选择图片 wx.chooseImage({ success: function (res) { var tempFilePaths = res.tempFilePaths var UploadUrl = "http://note.coccoo.cc/upload"; // 你要上传到的地址 // 公共上传方法 app.curl_upload(UploadUrl, tempFilePaths[0], 'img', {}, function (res) { var data = JSON.parse(res.data) // 一般需要解析json common.msgDialog("上传成功"); }, function (res) { common.errorMsgDialog(res.errorMsg); } ); } })以上 -
![.gitignore]() .gitignore 如果是已经commit之后修改.gitignore,是不会立刻生效的,需要使用git rm -r . --cached清除一下缓存区,然后git add -Agit commit另外有关于C#的.gitngnore模板.vs /build/ *.suo *.user _ReSharper.*/ *.sdf bin/ obj/ Debug/ Release/ *.opensdf *.tlog *.log TestResult.xml *.VisualState.xml Version.cs Version.h Version.cpp以及需要更多的话,可以查看https://github.com/github/gitignorehttps://github.com/github/gitignore/blob/master/VisualStudio.gitignore
.gitignore 如果是已经commit之后修改.gitignore,是不会立刻生效的,需要使用git rm -r . --cached清除一下缓存区,然后git add -Agit commit另外有关于C#的.gitngnore模板.vs /build/ *.suo *.user _ReSharper.*/ *.sdf bin/ obj/ Debug/ Release/ *.opensdf *.tlog *.log TestResult.xml *.VisualState.xml Version.cs Version.h Version.cpp以及需要更多的话,可以查看https://github.com/github/gitignorehttps://github.com/github/gitignore/blob/master/VisualStudio.gitignore